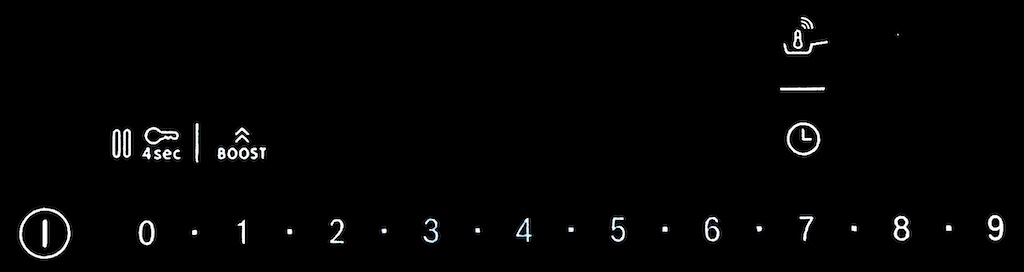
Here is an image of how the control buttons are shown in promotional material and probably how most users see them. This is a photo taken with my iPhone which enhances the white of the button symbols.
(Click the images to enlarge them.)
Here is an image of how the control buttons are shown in promotional material and probably how most users see them. This is a photo taken with my iPhone which enhances the white of the button symbols.
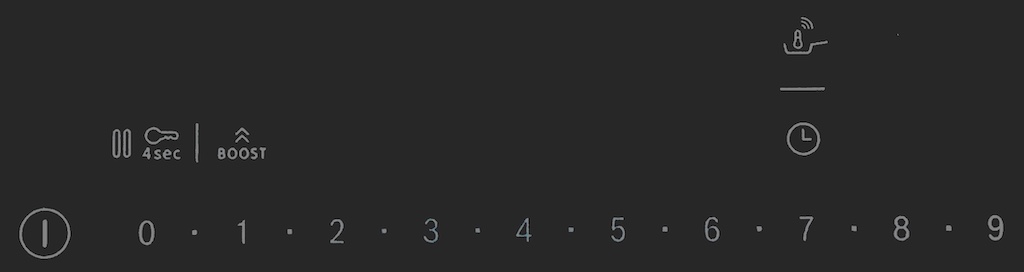
This image shows how the button symbols may appear to some users with reduced visual capacity. In fact, I cannot see them this clearly as they are much feinter than this, almost invisible in some light. I have installed very bright LED lamps in my cooker hood but I still have to move around to see the button symbols clearly.

Here is a photo of the hob switched on. As you can see, the buttons and legends do not light up, only the LEDs and important symbols. The LED indicators for each of the rings are clear and will show the power level of the selected ring form 0 - 9 in 0.5 degree increments. The LEDs have an underscore to indicate that this is the selected ring.

Here is a photo of the hob switched on with PerfectFry selected. As you can see, an additional LED display appears, on the right, showing the set temperature adjusted using the power slider. The ring LED changes to a "t" with a thermometer symbol (not captured in this photo because it alternates on/off with no pan on the ring). The temperature LEDs alternate during heating up or cooling down to show the set temperature and the actual temperature of the pan. The temperature symbol also changes colour during heat-up.
This is our first induction hob! For more than 40 years we have used ceramic hobs and learned to master them. Yes, they are energy inefficient and slow to react to control changes but they are easy to clean, simple to use and durable. Technology advances and induction hobs are, supposedly, more efficient (yet to be proven), and more controllable so we took the plunge. They're not cheap and you get what you pay for but, after hours of research we chose the Bosch PIX631HC1E because of its Flex Zones, PerfectFry and touch controls. The biggest problem we hit was actually seeing one in the flesh as we only have 1 large electrical retailer in our town and that's the other side of town. The reviews were good albeit with a few, stupid ones and a few that did say that the symbols on the surface were difficult to read but we made our decision and purchased from John Lewis online.
This article provides information not readily available on the Internet about the Bosch PIX631HC1E Induction hob which we purchased recently. I couldn't find photos of anything but the glass top. I am not going to go into details about how to fit the hob into your worktop/counter, nor am I going to go into the electrical installation. Full installation instructions are included with the hob and I cannot stress how important ventilation is so make sure that you have suitable apertures in your kitchen cabinets to allow free air flow.
If you are installing this into a worktop/counter which does not already have a suitable cutout and you doubt your woodworking skills, employ a carpenter. Similarly, if you have any qualms about the electrical installation employ a qualified electrician to connect the hob to the main power supply. DO NOT attempt to connect this hob to the normal ring main in your property as it is designed for a dedicated, high current, supply.
The hob is supplied with a 5 core flexible mains cable approximately 110cm in length. The hob itself is designed to work on split/2 phase supplies which are common abroad whereas most UK domestic installations will be to a single phase supply. This is not a problem and full wiring information is given in the installation instructions and on the underside of the hob.
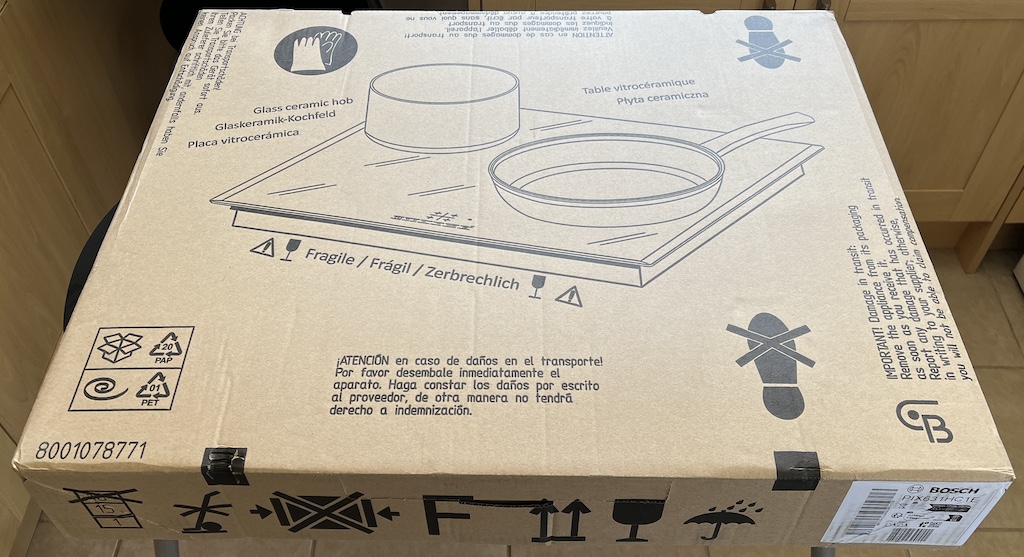
The box that the hob is delivered in is shown here minus 2 plastic straps. Check all areas of the box for damage as the last thing you want is to open the box and find a crack in the glass, or worse still, shards of glass in the bottom of the box! The lid of the box just lifts off to reveal the hob, as shown below, with its polystyrene protection.

As shown here, the hob is protected with polystyrene packing. The instruction booklets are below the hob in the box.

The hob in all its glory. I apologise for the reflections! This photo captures just how feint the button symbols really are compared with the QR code label above the Bosch logo.
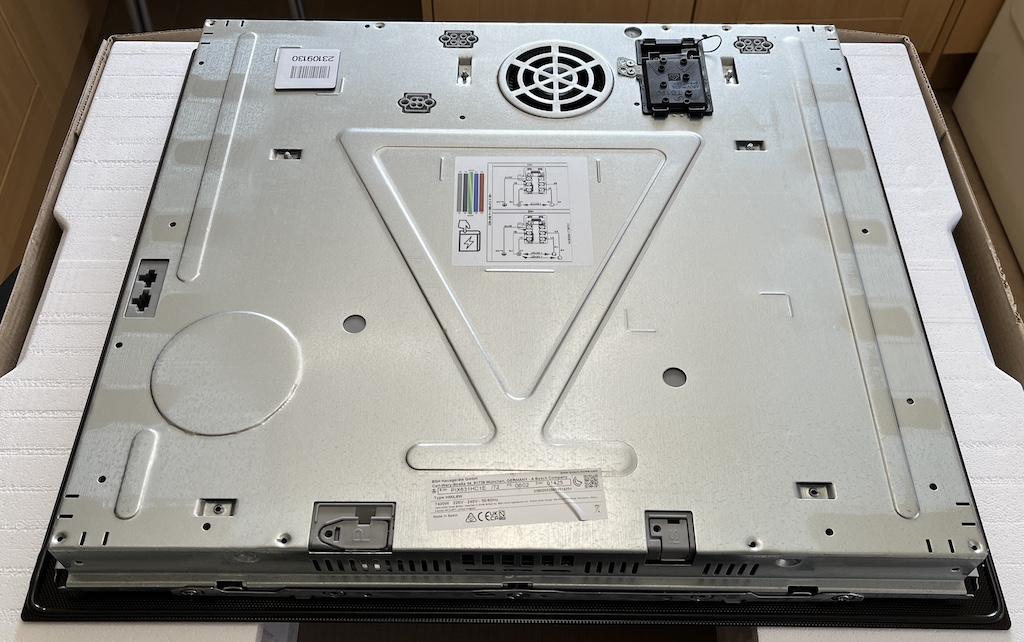
Here is what the hob looks like on the underside. The rear is at the top and the front at the bottom. Note the circular fan grill at the top of the photo, this is the air inlet and the air exhaust is along the front/bottom edge of the hob. You can also see the terminal box to the right of the fan inlet.
If you look closely, you can see a silicone rubber bead around the outside of the glass top which provides a seal when the hob is positioned in the worktop/counter to prevent debris from the work surface getting into the hob interior. Unfortunately, this bead results in the hob glass top sitting slightly above the surface which, in itself, can trap particles/debris. I do not advise sealing this gap with silicone sealant!

A clearer view of the hob exhaust port.

A rating sticker is attached to the underside of the hob which states that the hob can use up to 7400W or 7.4Kw in old money at 220 - 240V. This is very important as the circuit you connect the hob to must have a circuit breaker rated at at least 32Amp. An electrician would probably fit a 40Amp breaker in practice. The cable that is supplied with the hob is more than sufficient as it contains 5 x 20Amp conductors, paired for both Live and Neutral with a single Earth conductor.
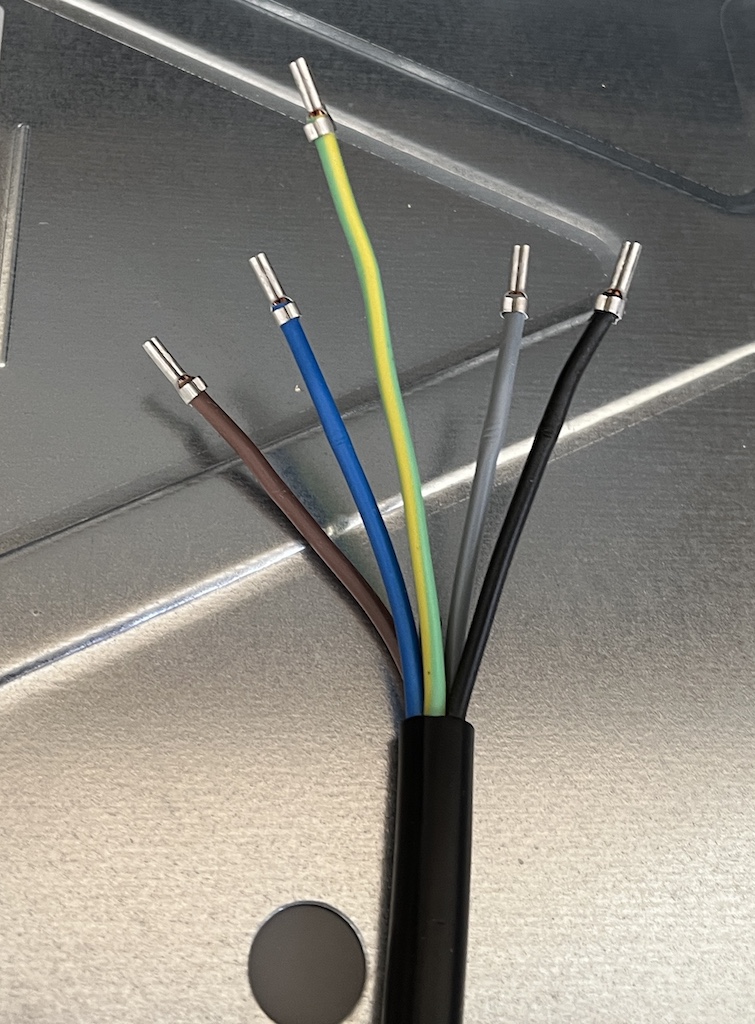
The hob comes supplied with a 1.1mtr cable made up of 5 x 20Amp conductors. Both ends of the cable are pre-fitted with flat terminal crimps as shown. The colours of the conductors are used as follows in a ~1N or single phase installation; Brown & Black = Live, Blue & Grey = Neutral and Green/Yellow = Earth.
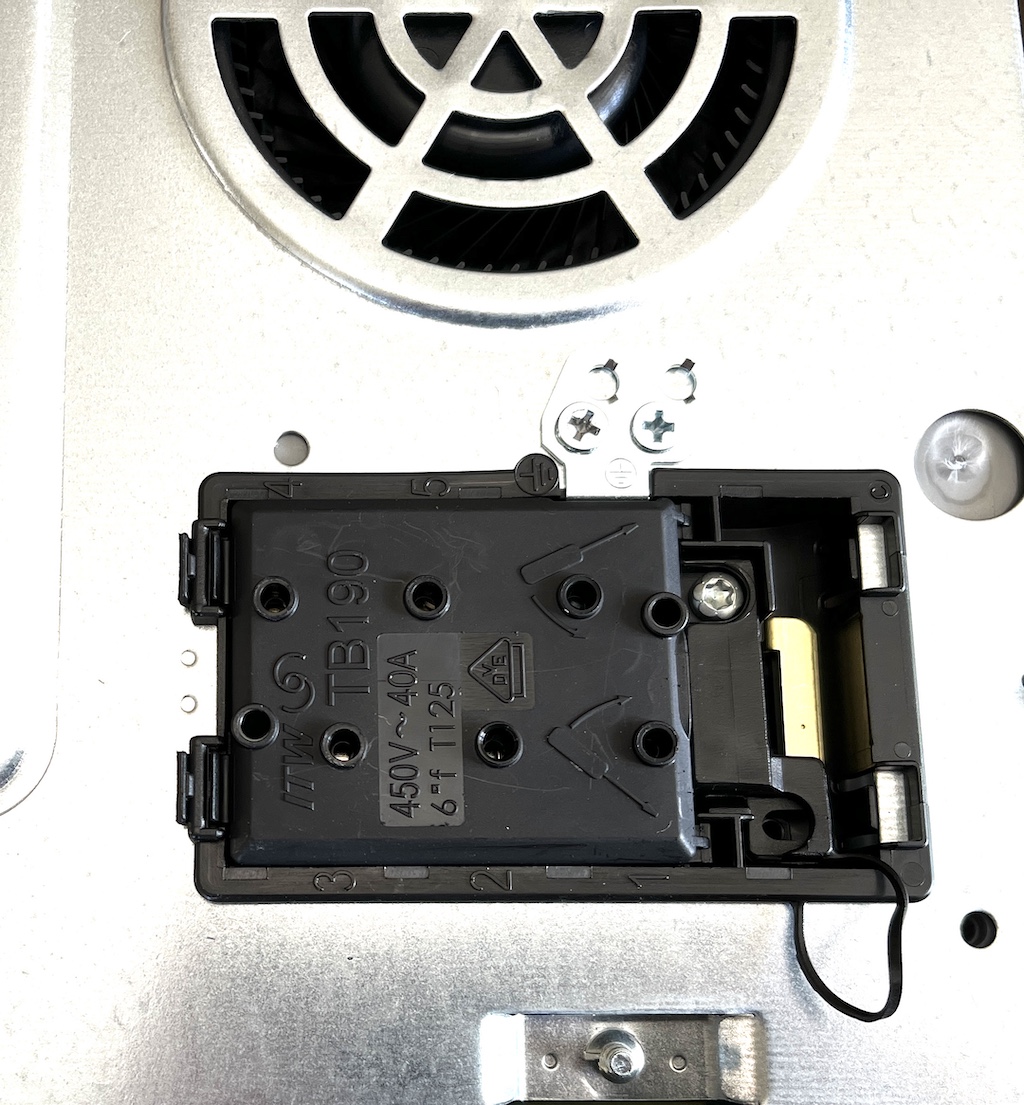
The terminal box is shown here. Note the spare links to the right of the cable clamp. A small flat bladed screwdriver is required to lift the lid on the box.
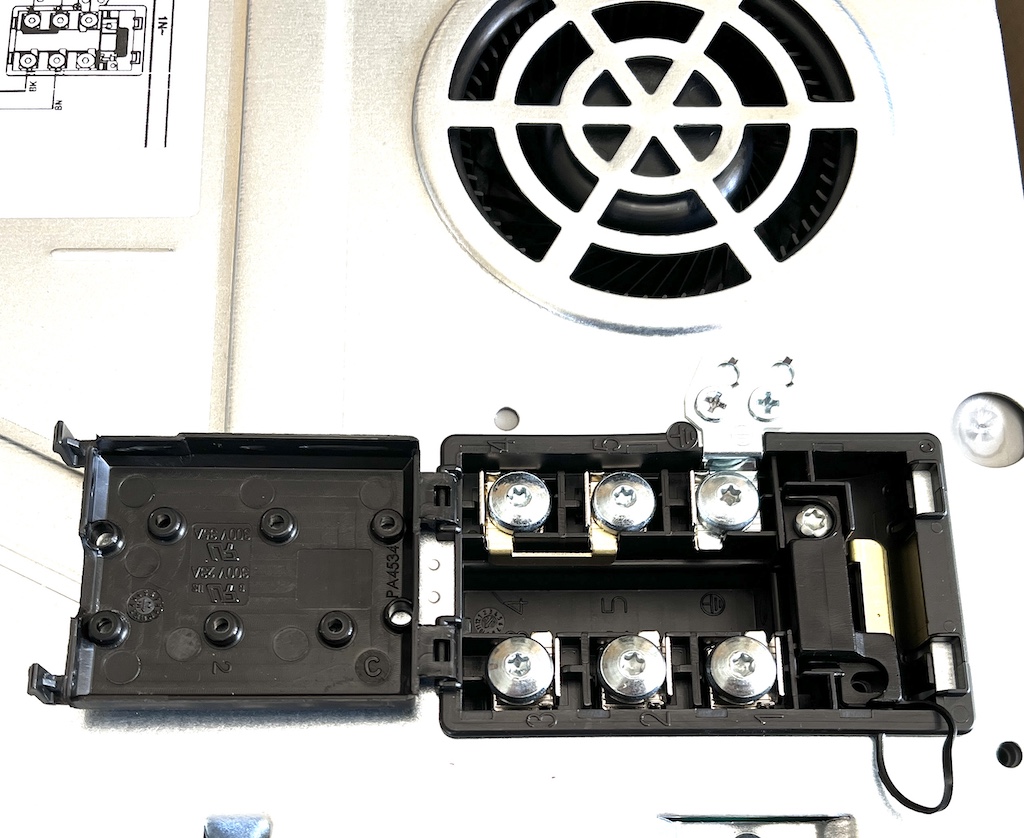
Here is the terminal box opened. Note the 6 Torx head screw terminals discussed below.

As can be seen in this image the Torx head terminal screws are 5.86mm in diameter making them M6 screws.
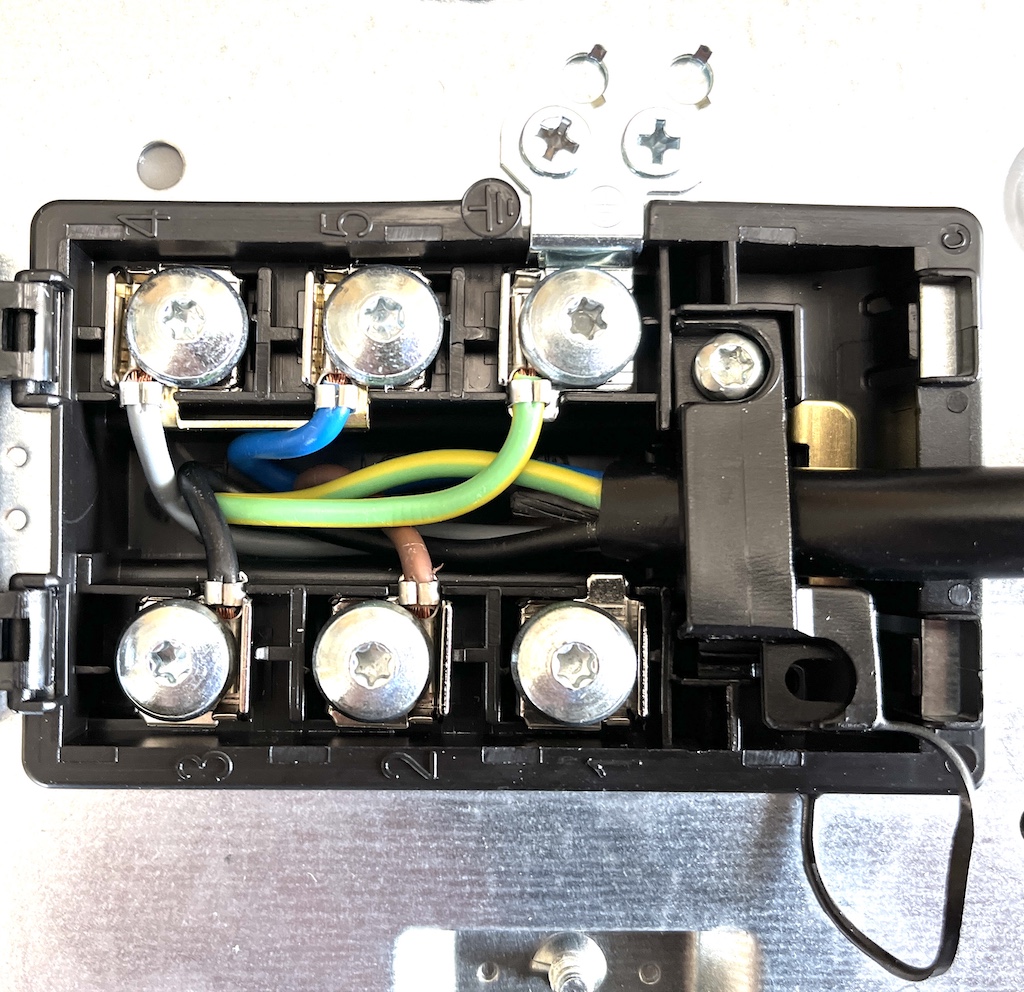
Here is the final cable installation to the terminals. Note the cable properly clamped under the cable clamp and the correct orientation of the flat terminal crimps.
Note the copper link on terminals 4 & 5 which bridges the neutral conductors. This link is very important. The live conductors on terminals 2 & 3 are not bridged and this is equally important.
This hob is designed to work on a 2 phase supply but in the UK we feed a single phase to each input which is fine. Internally, the hob uses the 2 phases for separate purposes and if one of the live conductors fails, the fault will be immediately obvious. On the other hand, if one of the neutral conductors should fail, there is a risk of one of the phases having a "floating neutral" which is not a good idea, hence, the bridging link on the neutral conductors.
OK, the hob's installed and you turn it on for the first time, don't panic, the hob starts up and illuminates each segment of the LED digits in a repeating pattern. This appears to be the normal startup self-test and it stops after a short while. The hob will then work normally. Don't grab a pan and start cooking yet because if you haven't already checked the compatibility of your cookware, now is the time to do it. There are 2 ways to check compatibility as follows
Not all pans are created equal as I found out the hard way! The next section describes an unfortunate experience I had with just 1 pan. The one lesson I have learnt is that quality pans really do make a difference on an induction hob.
I am the cook of the household, not because my wife cannot cook but because I really do enjoy cooking. Over the years I have built up a range of pans bought to work on our old ceramic hob but all but 1 of them ended up being compatible with induction hobs. What I am already discovering is that heat distribution and efficiency varies and I can clearly state that my expensive EasyGlide NeverStik pans are far superior to my less expensive stainless steel pans. By superior I mean better heat distribution and heating up time.

For my first test of the pans I added 0.5 or 1 ltrs of water to each pan dependent on its size, placed the pan on the best suited ring and applied full power (#9 in the case of this hob). I then timed how long each pan took to reach boiling point and make a note of the time. It was during this testing that my IKEA 365 pan was damaged. My other IKEA sauce pans worked well but the EzyGlide pans performed the best. One surprising finding was that an old Regis Ceramic non-stick frying pan bought from JML at least 15 years ago performed the best!
The hob comes with its own App which connects to the hob via Wi-Fi and I ask myself why? Having used the hob for some weeks I fail to see what the App actually adds to my cooking experience apart from making initial setup a little easier. I found that I had to disable most of the default facilities of the App especially the notifications on my phone as the hob will tell you every time a ring comes on, a temperature is reached or a timer has expired. All this on a hob which should be an "attended appliance". Then there's the standby power required to keep the Wi-Fi active. The best information I can glean suggests that the hob will consume =>0.5W on standby but up to 2W if Wi-Fi is enabled and for what?
You can also set the hob to only be controlled when you are standing near it using Bluetooth on your phone. Really! WHY? I clearly don't get it but to me a hob is for heating and cooking with the operator present.
The App offers recipes and suggested cooking times and temperatures etc. but you don't need continuous Wi-Fi connection for that. Turn it off is my advice but be aware that Bosch don't make that easy. I had to work it out for myself!
6-5-4 is a mantra I have gotten used to. Put simply, it's the power levels, in order, that I have to select to achieve a perfect, efficient simmer. Here's how it works for, say, cooking boiled potatoes:
I quickly learnt that turning the hob down from boiling to 4 kills the simmer and it will take a long time to begin simmering again. This is the way the hob works as the energy is instantly removed and there is no residual heat as there was on my ceramic hob. Yes, you could just set the hob to 6 and leave it simmering at that level but there will be a lot of steam and wasted energy. I am sure that you will have your own experience and work out what's best for you.
This hob is effectively split down the centre, to the left is the FlexZone and to the right are 2 separate rings, one large and one small. I think the rings on the right are a design flaw as the largest ring is at the front of the hob meaning that you have to reach over a large pan on the front to reach a small pan at the rear. Hello Bosch, stupid idea, in my opinion!
The FlexZone is great on the other hand as it really comprises 4 separate oblong rings which can be used individually for small pans or shared for larger pans. The secret to mastering the rings is to make use of the "Sweet Spot" markers "+" on each of the 4 segments. The control panel treats the 4 rings as 2 larger rings, front and back, unless you select to have all the rings work together as 1 ring for large baking trays or griddles. I'll leave you to work that one out.
So, if you want to use a small pan on the front and a large pan on the rear, simply centre your small pan over a "+" on the front ring and the hob will only apply power to where the pan sits. The large pan at the rear would be centred over 2 "+" symbols and the hob will automatically treat that ring as a single large ring. You learn very quickly that a small pan spanning 2 "+" symbols does not heat up as quickly.
Finally, you should always choose the correct single ring size for your pan. If however you have to use the large single 21cm ring for a pan that is smaller, put the pan toward the edge of the ring but don't use a pan that is less than about 60% of the ring diameter as this will waste a lot energy and the hob may refuse to work on that ring.
The hob itself is silent but, you will sometimes hear unfamiliar sounds, don't panic, this is normal. What can happen is that pans will rattle, make creaking noises or feel as if they are vibrating. This is the reaction of the ferrous components of the pan reacting to the magnetic fields being generated by the coils beneath the rings. Better quality pans, especially those made from aluminium with good ferrous inserts/layers don't appear to suffer so much but some stainless steel pans with lighter handles will definitely vibrate. You get used to it.
PerfectFry is a very useful feature which is available on the FlexZone. Put simply, selecting the PerfectFry function on a FlexZone ring will allow you to set the frying temperature of the pan or set a lower temperature for melting butter or chocolate for example. The control panel lights up a set of LED numbers and the slider control is used to set the temperature which the hob maintains fairly well. Unfortunately, Bosch decided to set the temperature increments to 10C up to 120C and then increments of 20C, should have been 10C across the range in my opinion.
Apart from the already mentioned feint button symbols be aware that the slider control does not always seem to work the way you think it should. For instance, place a pan on a ring, select it and run your finger along the slider and very often you will not be able to get past 8.5. A number of reviews have mentioned this and the solution is simple. Instead of using the slider, simply press at the "9" end of the slider and the hob will go straight to level 9. You can also turn the ring off by pressing the "0" end of the slider.
By default, placing a pan onto a ring when the hob is on will move the focus to the new pan and if you don't notice this you may end up adjusting the wrong ring if you didn't intend to make use of the new pan immediately. This action can be turned off using the App or the hob's own settings menu, RTFM.
Always make ensure that the bottom of your pan is perfectly dry, the loud pops and bangs will scare the life out of you!
Finally, the total power level of the hob is adjustable via the App or the built-in hob menu. As stated above, the total power consumption of the hob is 7.4Kw which should work fine on a 32Amp supply however, Bosch have catered for less than perfect supplies by allowing you to turn down the maximum consumption of the hob. For example, you can select a maximum of 5Kw which will significantly reduce the current requirement but beware this does not mean that all the rings have their power reduced. What actually happens is that the hob will perform normally until the set limit is reached whereupon it will not allow 1 or more of the rings to be used!